![]()


Product Info
I replaced a different company's GPU with SiMa.ai! [Environment setup part 1]

SiMa.ai (hereinafter referred to as SiMa) is a device with strengths in edge AI, rivaling the performance of Alpha Inc., a company that provides GPUs (graphics processing units). There are also voices expressing interest in actually using SiMa's MLSoC (Machine Learning System-on-Chip). In this article, we will introduce how to port a model that was running on Alpha Inc.'s GPU to SiMa and actually run it.
Overall Table of Contents
The transplant procedure is as follows:
Step-2: Preparation
Step 3: Environment setup
- Environment setup part 1
- Environment setup part 2
- Environment setup part 3
Step 4: Implementation
The goal of this chapter, "Environment Building Part 1"
- Learn how to connect the SiMa development kit to the host machine
The results of this demo video are as follows:
Alpha company video
SiMa Video
Table of contents for this chapter "Environment Construction"
Building the board and host machine environment for development and evaluation
We will introduce it in three pages.
- 1-1. Setting up the SiMa development kit environment
- 1-2. Setting up the SiMa development kit
- 2. Host machine environment setup
1-1. Setting up the SiMa development kit
Connect the host machine and the SiMa development kit via serial
Connect the SiMa board to the host machine via UART USB.
On the host machine, use the terminal emulator minicom, which is officially recommended by SiMa.*Use.
*minicom: A terminal emulator that runs on Unix-based operating systems (Linux, macOS, etc.), and is a tool specifically for serial communication (communication via serial ports). It is a useful tool for connecting to and operating microcontrollers, embedded systems, routers, etc., mainly via the serial console.
Installing Necessary Tools
Installing minicom
To install minicom, run the following command:
sima-user@sima-user-machine:~$ sudo apt-get install minicomDetecting serial devices
Check the device
Before connecting the serial cable between the host machine and the board,
To check the serial device connection on the host, run the following command.
sima-user@sima-user-machine:~$ ls /dev/ttyUSB* ls: cannot access '/dev/ttyUSB*': No such file or directoryYou'll be shown a list of existing devices or the above message if none exist.
Connect serial port 2 of the SiMa board
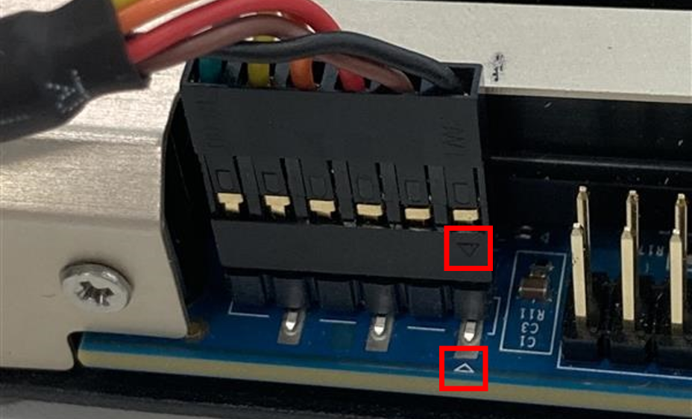
Now connect serial port 2 on the board to your host machine using the included USB to 6 pin USB FTDI cable.
The connection destination is the Debug COM port for HOST, and connect the cable so that the arrows on the cable and terminal match.

To check the serial device connection on the host machine again, run the following command.
sima-user@sima-user-machine:~$ ls /dev/ttyUSB* /dev/ttyUSB0You can now see your serial device.
If you cannot see the serial device even after connecting, try the following command.
You may see logs that show a connection being established but then immediately disconnected.
sima-user@sima-user-machine:~$ sudo dmesg | grep ttyUSBDepending on the environment, an application called "brltty" that supports braille displays may attempt a serial connection and take over the interface. If it is not needed, disabling or deleting it may resolve the issue.
Command to disable #
sima-user@sima-user-machine:~$ sudo systemctl disable brltty.service sima-user@sima-user-machine:~$ sudo systemctl stop brltty.serviceCommand to delete #
sima-user@sima-user-machine:~$ sudo apt remove brlttyConnecting to a serial port
Connect to the appropriate serial device
Configure minicom to connect to the lowest numbered device on your host machine, which is typically /dev/ttyUSB0, but if you have other devices plugged in it will connect to the newly listed device after you connect serial port 2 on the board. For example, if /dev/ttyUSB0 was already listed before you plugged in the board, then the correct serial port would be /dev/ttyUSB1.
To connect to the correct serial port, run the following command:
sima-user@sima-user-machine:~$ sudo minicom -D /dev/ttyUSB2 -b 115200, 8n1 -wAfter execution, you will first be asked for the login name and password of the host machine. After turning on the power and the automatic boot process, you will be asked for the login name and password of the development kit. Enter the login name "sima" and the password "edgeai".
Turn off hardware flow control
To turn off hardware flow control in minicom, follow these steps:
- Press Ctrl+A on your keyboard, then press Z.
- Select "Configure minicom".
- Open "Serial port setup".
- Select "Hardware Flow Control" and change it from ON to OFF.
* When selecting an option, you can select it by pressing the alphabet key displayed next to the option.
You are now connected to the serial port.
Next, we will set up the SSH connection.
How to connect the SiMa board to the network and set up an SSH connection
Network sharing between the board and the host machine
Offline board connection
Connect the SiMa board to the host machine using Ethernet (wired LAN).
The connection destination is Ethernet Port 0 (the port farthest from the PCIe connector. For details, please refer to the layout diagram above.)
Since an SSH connection via Ethernet generally allows for faster communication than a serial connection, we will connect the host machine and the SiMa board in an offline environment. However, in an offline environment, the IP address must be reconfigured every time the SiMa board is restarted. To avoid this, we will use the firmware configurator to automatically assign the IP address 192.168.2.20.
*In particular, there will be many procedures in the future for streaming videos from the SiMa board and displaying them on the host machine, so it is a good idea to set this up first.
Network Settings
- Open "Settings" in the top right corner of your PC screen and go to the "Network" section.
- Click the "+" icon in the "Wired" section to create a new configuration profile
(Edit your existing profile if you have one). - When creating a new profile, set the profile name to anything you like, such as "Local."
- On the IPv4 tab, select Manual and enter the following information:
"Address": 192.168.2.10, "Netmask": 255.255.255.0, "Gateway": blank.*If the default IP address of the camera you will use in the next steps is 192.168.1.x, it will be confused on the SiMa network device, so it will be smoother if you assign it to 192.168.2.x at this point.
- Set the DNS servers to 8.8.8.8 and 8.8.4.4.
- Click Apply.
- If you have an existing connection, please turn it off and then on again for the changes to take effect.
- To configure the network, run the following commands:
sima-user@sima-user-machine:~$ sudo ifconfig eth0 192.168.2.20 up - To test your SSH connection, run the following command:
When you connect for the first time, you will be asked for the host key. Enter "yes" and enter your password.sima-user@sima-user-machine:~$ ssh sima@192.168.2.20 The authenticity of host '192.168.2.20 (192.168.2.20)' can't be established. ED25519 key fingerprint is SHA256:wTptaqbB9zdLlKpWzRKnkb31cZKnvfmZ4ftXgwXU9kw. Are you sure you want to continue connecting (yes/no/[fingerprint])? yes Warning: Permanently added '192.168.2.20' (ED25519) to the list of known hosts. sima@192.168.2.20's password:******* Last login: Mon Nov 27 19:58:33 2023 davinci:~$* If an error occurs at this point, the SSH server settings may not be sufficient. Please check the SSH server settings via a serial connection, such as whether the "PasswordAuthentication yes" setting is present in the /etc/ssh/sshd_config configuration file.
To check the connection, run the following command against the host's IP address (192.168.2.10). If the following display appears, the connection is successful.
Execution command
davinci:~$ ping 192.168.2.10Expected display
PING 192.168.2.10 (192.168.2.10): 56 data bytes 64 bytes from 192.168.2.10: seq=0 ttl=64 time=0.598 ms 64 bytes from 192.168.2.10: seq=1 ttl=64 time=0.703 ms 64 bytes from 192.168.2.10: seq=2 ttl=64 time=0.639 ms ^C --- 192.168.2.10 ping statistics --- 3 packets transmitted, 3 packets received, 0% packet loss round-trip min/avg/max = 0.598/0.646/0.703 msIf the host machine has an SSH server running, an SSH connection is also possible.
davinci:~$ ssh sima-user@192.168.2.10 The authenticity of host '192.168.2.10 (192.168.2.10)' can't be established. ED25519 key fingerprint is SHA256:ic7JwZC8CdidIP3UaNBmAZ868j5HMm0oBBSc6IOgBNE. This key is not known by any other names Are you sure you want to continue connecting (yes/no/[fingerprint])? yes Warning: Permanently added '192.168.2.10' (ED25519) to the list of known hosts. sima-user@192.168.2.10's password: Welcome to Ubuntu 22.04.3 LTS (GNU/Linux 6.6.1-060601-generic x86_64) * Documentation: https://help.ubuntu.com * Management: https://landscape.canonical.com * Support: https://ubuntu.com/advantage Expanded Security Maintenance for Applications is not enabled. 81 updates can be applied immediately. 8 of these updates are standard security updates. with ESM Apps. Learn more about enabling ESM Apps service at https://ubuntu.com/esm Last login: Mon Dec 4 18:29:29 2023 sima-user@sima-user-machine:~$Automatic IP address assignment settings
Once the above steps are complete, reboot the board.
Press "Ctrl+A" on the keyboard, then press "Q" to disconnect the board from the host machine. Then reconnect the serial port. When the message "Hit any key to stop autoboot" appears while the board is booting, press any key to stop autoboot.
Please execute the following command.
sima:~$ env set forcenetcfg static; saveenv sima:~$ bootThe board will restart, and once you have confirmed that the settings have been updated, the offline environment connection is complete.
In the next chapter, we will show you how to check for the latest version and the update procedure.
Company Profile
- Company Name
- SiMa Technologies, Inc.
- Established
- 2018
- location
- America (Silicon Valley)
- business
- Providing SoC and SDK specialized for image processing edge AI
Inquiries regarding this product
Telephone enquiries
Solution Technology Department 3
03-6361-8095Reception hours: Weekdays from 9:00am to 5:00pm
Contact by email
Inquiry FormWe deliver email newsletters that provide useful information such as the latest news and industry trends. Subscription is free and easy, so please sign up!
If you have any questions or comments about Shinko Shoji, or would like to discuss our products or services, please feel free to contact us using the inquiry form below.